How to Register for GST: A Step-by-Step Guide
Businesses having an aggregate turnover of Rs 40 lakh or Rs 20 lakh in special category states have to be registered under the GST. It helps businesses manage better cash flow through input tax credits and other government subsidies. This guide offers a complete step by step process to register under GST.
The GST registration process is done in two parts. To begin with the process, a taxpayer has to complete part A and then move to part B. Once you are done with the part A process, you have a maximum of 15 days to complete the registration of part B. Part B is the final stage, and once verified, the authorities issue a unique GSTIN to applicants.
GST Registration Process
Step 1
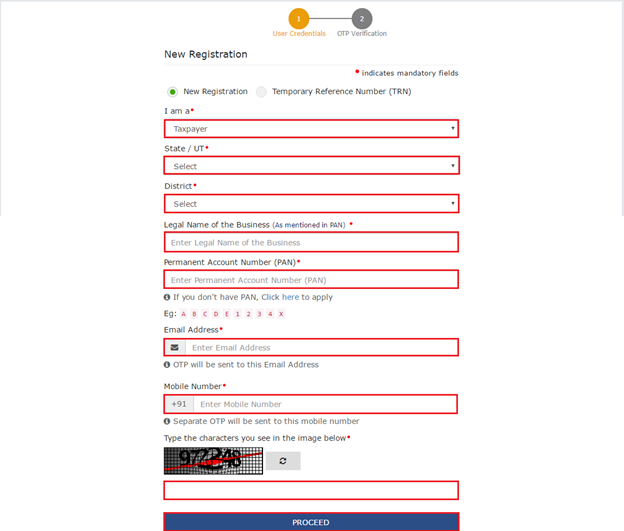
Visit the official GST Portal and go to the “Services” then select “New Registration”. Once you select “New Registration”, there appears a drop-down menu Select the

- “Taxpayer” type
- Select State and District
- Enter the Business Name and PAN of the Business
- Submit Email and Mobile Number if they are not linked with PAN already
- Enter the captcha code and click on” Proceed” for the verification
- Now you will receive OTPs on the registered mail ID and the mobile number (note both the OTPs received through mail and mobile number must be submitted)
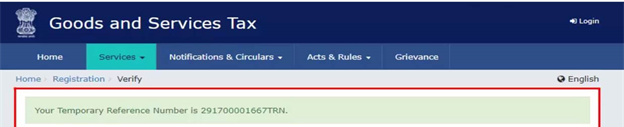
- Click on “Continue” to receive a 15-digit Temporary Reference Number (TRN) (save TRN to proceed further on part B of the GST Registration Application)
Step 2
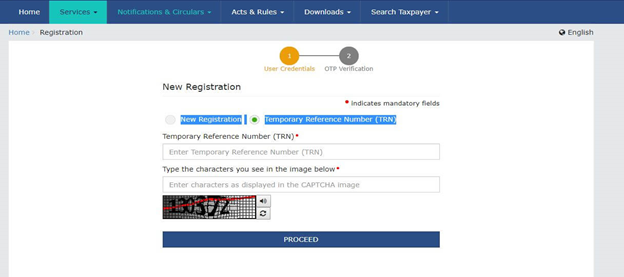
Now again go to the official GST Portal (link provided above) and select “Services” then “New Registration” and click on “TRN”
- Submit the 15-digit TRN and enter the captcha code. You will get an OTP on the registered mobile number or mail ID.
- Submit the OTP and there appears the current application status as “Draft” Then click on “Edit Icon” from the “Draft Menu”
- Then will come a 10-step registration process

Step 3
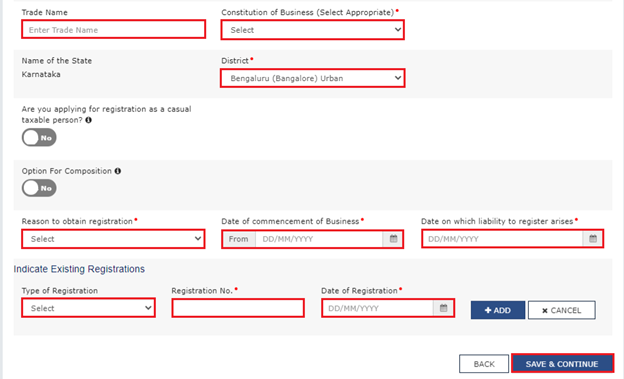
“Business Details Section”
- Provide “trader name”, “business constitution” and “district”
- Moving on, select “yes or no” for the composition scheme and select the category from the drop-down menu to select for type of taxpayer
- Generate a “challan” by entering the details for advance tax payment as per the laws for casual taxable person
- Further select anyone from the “Reasons to Obtain Registration” as per the selection, there will appear field to be filled
- Submit date of commencement of business and the date on which liability to register arises
- Under the “Indicate Existing Registrations” choose the type of registration, registration number, and date of registration and click on “save & continue”
- The “Business Details Section” is complete
Step 4
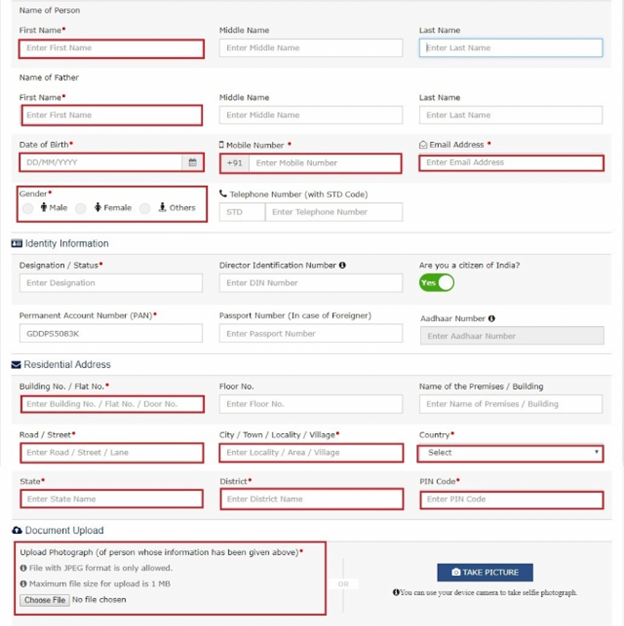
“Promoters/Partners Section”
- Provide the personal information including name, address, mobile number, date of birth, mail address, and gender of up to the 10 promoters or partners
- Under the “Identity Information” section enter the designation status, director identification number if the taxpayer is a company, PAN, and Adhaar details (passport number in case of foreign national)
- In the “Residential Address” section provide the building or flat number, PIN, State, District, locality, country, or more and upload a photograph and click on the “save & continue”
Step 5
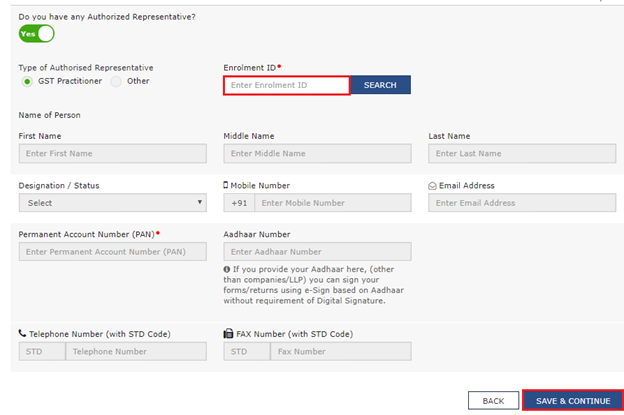
“Authorized Signatory & Authorized Representative”
- Follow the same steps as of “Promoters/Partners” and upload the details if you are a GST Practitioner, then submit “Enrolment ID” and other personal details, designation, PAN, and Adhaar and click on the “save & continue” button
Step 6
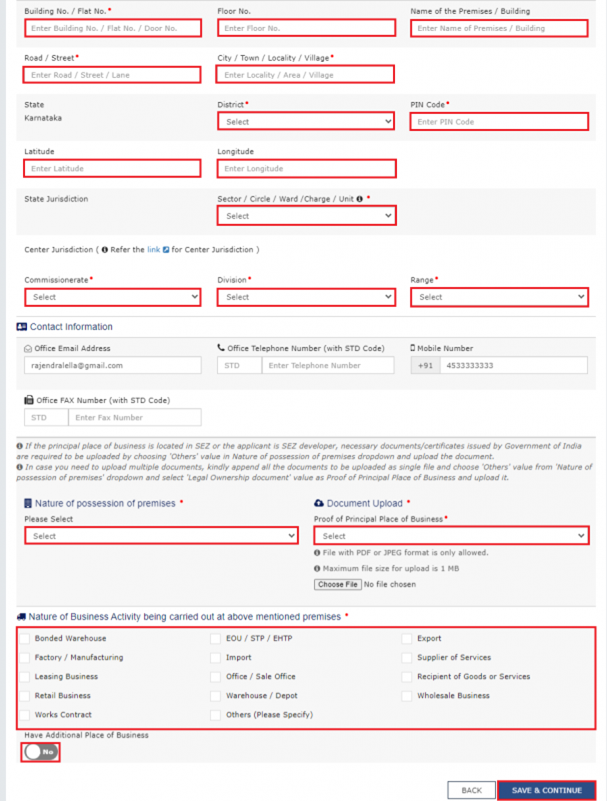
“Principal Place of Business Section”
- All the important details about the principal place of business where primary activity happens for the development of the business
- Report premises, district, state, sector, circle, ward, unit, commissionerate and division codes
- Upload NOCs or consent letters select the business activity being carried out on the selected premises and click on “save & continue” to move on to the next step
- Enter “Additional Place of business” details of any
Step 7
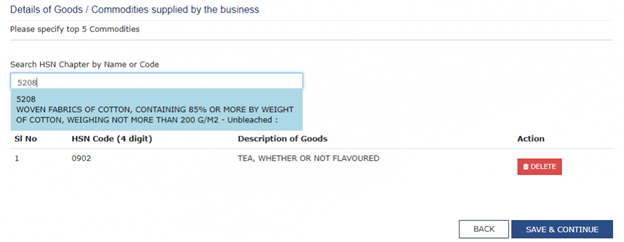
“Goods & Services Section”
- Enter the HSN or SAC codes for up to a maximum of 5 goods and services each in the goods and services menu and click on the “save & continue” to proceed further
Step 8
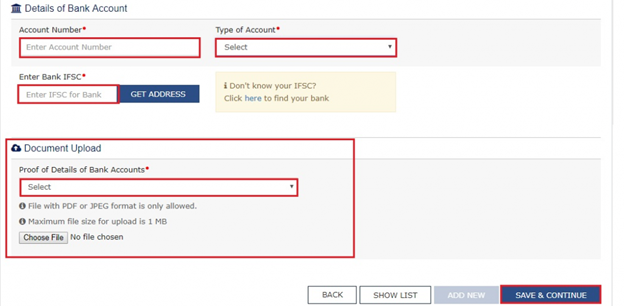
“Bank Accounts”
- Submit the bank account details and information up to 10 Bank account details through this section are made optional from now
Step 9
“State Specific Information”
- Enter “Professional Tax Employee Code”, “Professional Tax Registration Certificate”, “State Excise License No.” and the name of the person whose name excise license is held in the state-specific information tab
Step 10
“Adhaar Authentication”
- The Adhaar Authentication is optional and taxpayers can choose accordingly. Still you go for Adhaar Authentication, the physical verification of the premises or business address will be unnecessary
Step 11
“Verification”
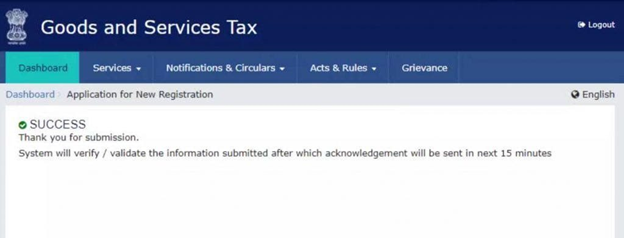
Submit the application form for verification. For companies and LLPs, you have to apply with DSC or by using e-sign or EVC for successful verification of the GST Registration application.
Once verified by the authorities, the applicant receives an Application Reference Number or ARN on the registered email or mobile number, through which you can track the status.
TaxDunia is by your side so that you can have seamless GST Registration. Our team of professionals ensures that you meet all the legal compliances and your business is growing rapidly altogether. TaxDunia’s customized solutions simplify the rigorous process of GST Registration, get started today with our dynamic team.